Friday, October 25, 2013

Luau

One recent evening, our son Toby and his girlfriend came over for dinner.  Jen suggested that we have a surprise party for Toby’s 30th birthday.  What a great idea!  So we came up with Hawaiian as a theme.  I refined the menu over the course of the next week, shopped and prepped. 
 
Lilikoi Cheesecake


Spam Musubi
Macaronic Salad


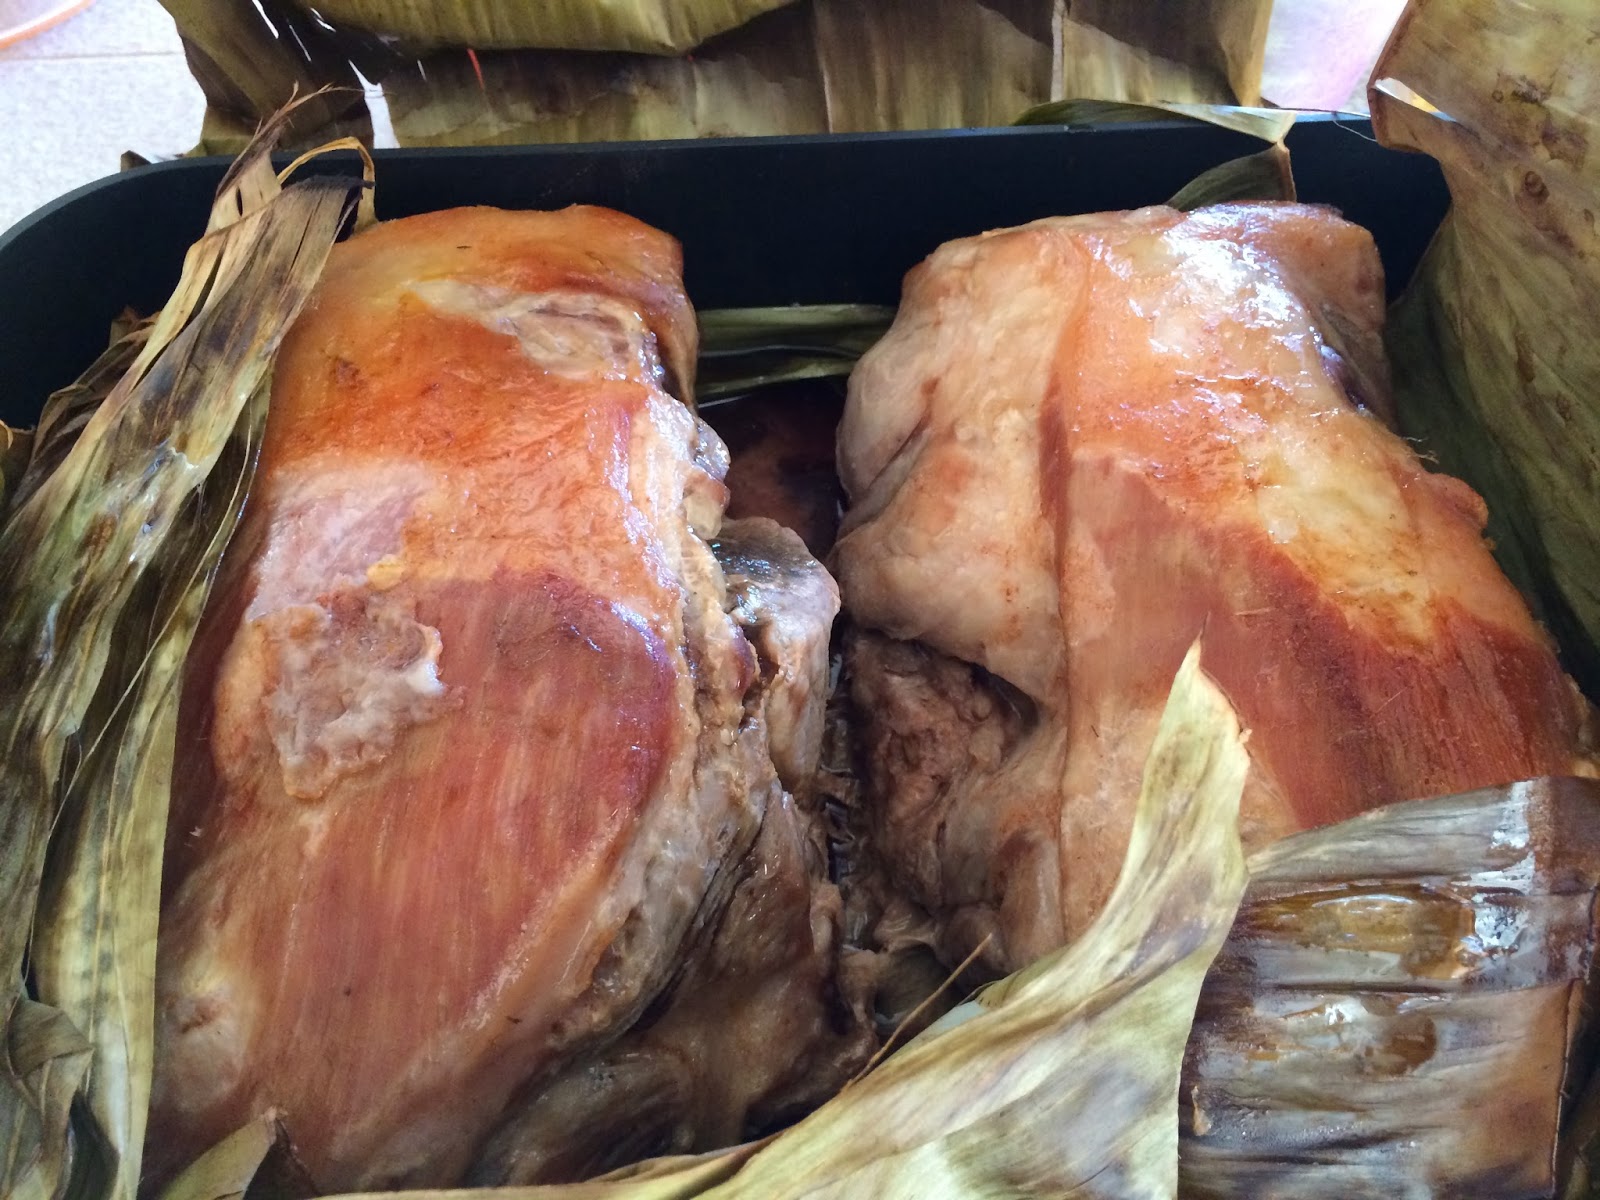
Banana Leaf Roasted Pork
Jen's Hawaiian Coleslaw

Poi


Tofu Poke

Seafood Poke


Fried Rice


Lilikoi Cheesecake – The cheesecake was purchased from Costco, and then I topped it with my Passion Fruit Jam.
Spam Musubi – This is a ubiquitous snack available all over Hawaii.  It is composed of rice and Spam wrapped together by a strip of nori.  Spam was introduced to the islands during the Second World War when it was brought over by the military.  Since then, Spam has become part of numerous dishes in Hawaii.
Macaroni Salad – Macaroni Salad or sometimes, Potato-Macaroni Salad is an integral part of a “Plate Lunch”.  A Plate Lunch consists of a meat dish (such as teriyaki, laulau, fried shrimp tempura, chicken adobo, etc.), 2 scoops of rice, and a scoop of macaroni or potato-mac salad. 
Banana Leaf Roasted Pork – I debated with myself for several days on a pork dish and finally I came up with this.  The concept was borrowed from Kalua Pork and Pork Laulau.  I used 2 boneless pork picnic shoulders and seasoned them with patis (Filipino fish sauce) and Hawaiian sea salt, and wrapped them with fresh banana leaves.  Then I baked them in a 300°F oven for 6 hours.  Everyone raved that the meat was moist and tender!
Jen’s Hawaiian Coleslaw – Jen made this dish.  She added Mandarin orange segments for flavor and color.
Poi – Poi is the traditional Hawaiian staple made from taro root.  It is boiled or steamed and pounded to form a paste.  Oftentimes it is allowed to ferment slightly to develop a sour taste.  This poi came from Hawaii!
Tofu PokePoke is popularly known as a dish of seafood cut into blocks and seasoned with salt, seaweed, soy sauce and sesame oil.  I made this one with firm tofu, sesame oil, chile pepper flakes, sliced scallions, Alaea red Hawaiian sea salt and fresh ogo.  Ogo is a thin purplish-brown seaweed from Hawaii.
Seafood Poke – I used the same seasonings but on baby octopus tentacles and fresh salmon.
Fried Rice – This is a Filipino version of fried rice.  To steamed white rice I added: minced garlic, diced pork, diced chicken, sliced Chinese sausage, peas and carrots, soy sauce, ground white pepper, and strips of egg omelet.
Not pictured are: Shoyu Chicken, Chuka Salad (seaweed and sesame seeds), and sliced carved fresh pineapples.
I love planning for a party, particularly if there is a theme.  It is exciting to research dishes and traditions and put together a menu!  This is a great way to get to know someone else’s culture.  In this case Hawaiian culture as we know it today is a mélange of different ethnicities.  First of course are the Polynesians who came to the islands from the Marquesas, and later from Tahiti.  Then Captain James Cook discovered Kauai in 1778 and a succession of Europeans and Americans followed him.  The next wave of immigrants followed about 100 years later comprised of Chinese, Japanese, Okinawans, Koreans, Puerto Ricans, Portuguese from the Atlantic islands, and Filipinos.  This mixture is reflected in the luaus or feasts where you may find Okinawan Konbu Maki right next to a Portuguese Vinha d’Alhos.  The majority of people living in Hawaii are haole, or mixed. 
 
As I mentioned above, some of the ingredients I used came from Hawaii.  Being a bit of a purist, I strive to be as authentic as I can.  And obtaining authentic ingredients is part of the fun; it’s like a treasure hunt!  To obtain these ingredients often means having to go into ethnic grocery stores which is an adventure in itself because you’re sure to find new foods and ingredients, and then learn how to use them!  It’s a never-ending journey!
So, how far do you go to obtain authentic ingredients?


Wednesday, October 16, 2013

Gratin Dauphinois

Milk, heavy cream, garlic, grated Gruyere, nutmeg, potatoes

Sliced potatoes using a mandolin

Assembled dish

                                                                               
                                                                                                                Gratin Dauphinois


There are several versions of this dish from the Dauphine region of southeastern France.  Sometimes they omit topping it with cheese.  But actually, gratin originally referred to the crispy bits at the bottom of the pan.  A gratin is usually prepared in a shallow oven-proof dish, and is baked or broiled, and is served in its baking dish.  This is commonly called Potato Gratin or Scalloped Potatoes.

Gratin Dauphinois

Ingredients:

2 ¼ lbs russet potatoes

2 garlic cloves, crushed

½ cup grated Gruyère cheese

Pinch of nutmeg

1 ¼ cups heavy cream

½ cup milk

1.       Preheat the oven to 325°F.  Thinly slice the potatoes with a mandolin or sharp knife.  Butter a 9 x 6 ½ inch ovenproof dish and layer the potatoes, sprinkling the garlic, grated cheese, nutmeg and seasoning between the layers and leaving a bit of cheese for the top.  Pour the cream and milk over the top and sprinkle the cheese.

2.       Bake for 50-60 minutes or until the potatoes are completely cooked and the liquid absorbed.  If the top browns too much, cover loosely with foil.  Leave to rest for 10 minutes before serving.

***********

Prior to making this dish I had made Pommes Anna which is like a simplified version of Gratin Dauphinois.  All it is is sliced potatoes and melted butter – so simple but so good.  So when I came to the recipe for Gratin Dauphinois, I thought, “This must be better!”

Making this was very easy.  First I sprayed my ovenproof dish with a cooking spray for easy cleanup later.  Then I used a mandolin to slice the potatoes which is a huge time saver.  However I grated the cheese and nutmeg myself because then I know that my ingredients are fresh.  Note:  always buy your spices whole and grind them yourself.  You not only save money this way, but are ensured that they are flavorful.  I used a microplane to grate the nutmeg.  Layering and baking is the easy part.

The finished dish was thoroughly enjoyed by my family, and my daughter in particular.  It was creamy and cheesy.  Yummm!  However, I found the potatoes to be a bit less tender than I would like.  The next time I make this dish I will cover it with foil, and then put it under the broiler the last 5 minutes to brown the top. 

How do you make your scalloped potatoes?

Tuesday, October 15, 2013

Afritada

Ingredients for Pork Afritada

Fried pork and fried onions

Meat and vegetables simmering in the pot

                                                                                
                                                                                                         Pork Afritada


This dish is an ode to my Filipino heritage. 

The Philippines was ruled by Spain for over 400 years from 1521 through 1898. Another Spanish colony was Mexico, and the Galleon Trade flourished between Acapulco and Manila for 250 years.  The galleons brought Chinese silk, porcelain, ivory and other luxury items bound for Spain.  Upon return, they brought foodstuffs such as olive oil, potatoes, flour, chorizo (sausage), and saffron.  Dishes made with these ingredients were once only for the elite.  Now they are more commonly served specially during birthdays, fiestas and other important occasions. 


Pork Afritada

Ingredients:

3 large onions, cut into eighths

1 cup plus 2 tablespoons olive oil

6 large potatoes cut into eighths

5 lbs pork, cut into 1 1/2 inch cubes

1 head garlic, cloves crushed

2 mild chiles

4 bay leaves

5 cups diced tomatoes or about 15 plum tomatoes chopped coarsely

½ cup soy sauce

2 large red bell peppers, cut into 1” squares


1.        Toss potato slices in 2 tablespoons of olive oil.  Bake in 350°F oven on a single layer until golden brown.  Remove from oven and sprinkle with salt.

2.       Heat remaining olive oil in a large pot or wok.  Fry onions until translucent.  Using a slotted spoon, remove onions and drain.  Return drained oil to pot.

3.       Brown pork pieces on all sides.  Transfer to a warm plate.

4.       In same pot, sautée garlic and bay leaves for about 2 minutes.  Add tomatoes and mild chiles and let cook about 5 minutes.  Add reserved pork and soy sauce.  Cook until tender.  Stir in red bell pepper, reserved onions and baked potatoes.  Season with salt and pepper.


******************

Lately I have been making a lot of French dishes, before that Italian and other cuisines.  So yes, it’s about time to go back to my roots.  My maternal grandfather served with the US Air Force during World War II and upon his return he wanted good home-cooked meals.  My mom told me that she used to make this dish almost every Sunday, thus she became good at it. 

Afritada means fried.  Frying the meat seals the juices in, helps to develop a beautiful brown color, and creates the basis for fond – the brown bits at the bottom of the pan.  This dish is also popularly made with chicken.

Unlike most sautéed Filipino food, the onions are fried first and then removed.  Frying the onions infuses the oil which flavors the meat.  By removing the onions they keep their shape and consistency.  In the Philippines the potatoes are fried but I baked them to reduce the oil content.  Why do I use fresh tomatoes instead of tomato sauce?  For authenticity’s sake.  Back then people didn’t just pop open a can of tomato sauce!  What kind of tomatoes?  Plum tomatoes would be ideal because they are more meaty, but whatever you have will do.  I used what was left over from my summer garden: grapes, Champions, Queen Ann, Black Russian, etc.  Most versions of this recipe calls for some water to be added.  I almost never add water to a dish because it will only dilute flavors from the meat and vegetables.  Besides, the tomatoes will provide a lot of juice.  The outcome will be a rich, thick gravy as befits a proper stew, not a watery soup.

Did you notice how the soy sauce snuck in there?  Remember, this is a Philippine dish where Spanish and Chinese influences constantly marry.

I was asked by one reader why my garlic looks like they came in chunks.  It is because I buy the peeled cloves in bulk, run them through the food processor and freeze them in little resealable snack bags.  That way, whenever I need garlic, I just get the little bag from the freezer and cut off what I approximate to be the amount called for.  I do the same thing with ginger.

When we had it for dinner, one finicky family member remarked that the onions were sweet.  That family member also ate the stew with only the potatoes which I served on the side instead of mixing them in.  When I eat this or other Spanish-influenced Filipino dish I usually don’t eat the potatoes because I would rather let white steamed rice soak up the rich gravy.  How could anyone not like this dish which is redolent with garlic and tomatoes, and studded with sweet onions and bell peppers?  The best part about this dish as with most stews is that it gets better after the first serving.  The meat absorbs more of the flavor as time passes and with each heating.  Even after all the meat is gone, you’ll still be left with that glorious gravy!

What favorite recipe has been handed down in your family?

Wednesday, October 9, 2013

Scones


Ingredients for Scones


Butter cut into the flour.


Egg and milk mixed in the flour mixture


Kneaded dough


Dough cut into wedges


Scones with Passion Fruit Jam


Whenever I make my jams the first thing that comes to mind is having them with scones.  A scone is a quick bread, not a pastry, and is leavened with baking powder, not yeast.  It is most often associated with the cream tea or Devonshire tea. 


Scones

Ingredients:

3 cups all-purpose flour

½ cup white sugar

5 teaspoons baking powder

½ teaspoon salt

¾ cup butter, cut into ½ inch squares, frozen

1 egg, beaten

1 cup milk

1.        Preheat oven to 400°F.  Lightly grease a baking sheet.

2.       In a large bowl, combine flour, sugar, baking powder, and salt.   Cut in frozen butter.  Mix the egg and milk in a small bowl, and stir into flour mixture until moistened.

3.       Turn dough out onto a lightly floured surface, and kneed briefly.  Roll dough out into a ½ inch thick round.  Cut into 8 wedges, and place on the prepared baking sheet.

4.       Bake 1 minute in the preheated oven, or until golden brown.

**********************

I freeze the butter so that when mixed into the dough and baked it retains its form.   As the dough bakes, the butter melts and creates little air pockets which keep the scones from becoming too dense.  When kneading the dough be gentle for tender scones.

I like this basic recipe for my jams and other creations because it is a good background for the fruit flavors.  Of course you may add dried currants or raisins, orange or lemon zest, or even some herbs for a more savory flavor. 

Once you bite into this crumbly buttery cake, you’ll always want to have scones with your butter, jam or Meyer Lemon Curd.  So when are you going to join me for breakfast…or tea?

Saturday, October 5, 2013

Poulet Vallee d'Auge

Chicken browned in butter

Onions, leeks, apples and celery


Flames after pouring in brandy
Chicken braising

Mushrooms sauteeing in butter

Apples sauteed in butter

Poulet Vallee d'Auge


This dish is named for the apple-growing region in Normandy, France although it is popular in Brittany as well.  It is the same place where Calvados, the apple brandy originates.  Both ingredients appear in this dish which has a rich and creamy sauce.  If you hear it referred to as Poulet au Cidre, it means the chicken was cooked in apple cider rather than chicken stock.
 
Poulet Vallée d’Auge
Ingredients:
5 lbs chicken
3 apples
1 ½  tablespoons lemon juice
1 leek, white and pale-green parts only, halved lengthwise, sliced crosswise ¼” thick
2 ½ oz butter
2 shallots, finely chopped
½ celery stalk, finely chopped
1 tablespoon all-purpose flour
4 sprigs thyme
2 bay leaves
1/3 cup Calvados or brandy
1 ½ cups chicken stock
½ lb crimini (baby bella) mushrooms, trimmed, halved
1/3 cup crème fraîche
 
Directions:
1.        If using a whole chicken, cut it into eight pieces.  If using breasts with ribs attached, cut them into half.
2.       Peel and core the apples.  Finely chop half of one apple and cut the rest into 12 wedges.  Toss the apple slices  in the lemon juice.
3.       Heat half of the butter in a large pan, then add the chicken pieces, skin side down, and cook until golden.  Turn over and cook for another 5 minutes.  Lift the chicken out of the pan and tip away the fat.
4.       Heat 1 tablespoon more butter in the same pan, add the onion, leeks, celery and chopped apple and fry over moderate heat for 5 minutes without browning.
5.       Remove from heat.  Sprinkle flour over the vegetables and stir in.  Add the Calvados, and ignite with a long match or lighter. After flames die down, return to the heat.   Gradually stir in the chicken stock.  Bring to the boil, return the chicken to the pan, cover and simmer gently for 15 minutes, or until the chicken is tender and cooked through.
6.       In the meantime, heat the remaining butter in a small frying pan.  Add the apple wedges and fry over moderate heat until browned and tender.  Remove from the pan and keep warm.  Do the same with the mushrooms.
7.       Remove the chicken from the pan and keep warm.  Skim the excess fat from the cooking liquid.  Add the crème fraîche, bring to the boil and boil for 4 minutes, or until the sauce is thick enough to lightly coat the back of a wooden spoon.  Season and pour over the chicken.  Serve with the apple wedges and mushrooms.
 
*******************
Although I’m not a big fan of sweet and savory together I decided to try this dish because I’ve always wanted to flambé.  No, I’m not a pyromaniac; I just wanted to see how long alcohol in food burns, and what happens to the food as the alcohol burns.  I was not disappointed.
I cooked this dish while my son and his girlfriend were visiting.  Actually, I was teaching her how to make jam.  I found a recipe for Poulet Vallée d’Auge in my French cookbook (The Food of France A Journey for Food Lovers) a couple of weeks ago, and then a few days before I made the dish when I opened my October issue of Bon Appetít, there was a recipe for the same dish (but with more ingredients and the directions slightly different) by Mimi Thorisson.  How serendipitous is that!  I liked the simplicity of one and the detail of the other so I decided to combine the two and make it my own. 
While the chicken was browning in the butter, Jen kept saying how good it smelled.  Indeed, it was very fragrant.  Jen helped me make the dish while she told me of their culinary adventures.  I kept going back and forth between the two recipes trying to marry them which was very interesting.  When it came time to pour the brandy into the pot with the vegetables, I had Jen take the pictures.  After I poured the brandy, I lit it with a utility all-purpose lighter like the one I use when grilling.  Immediately, the dish went up in flames!  Neither recipe said what to do while the alcohol burned.  When I saw that the bay leaves caught fire I started to stir the ingredients.  And it kept on burning.  So I kept stirring, and Jen kept taking pictures.  Thank goodness I was using a 5 quart pot.  Finally the flames died down, and we continued with the recipe. 
Have you ever flambéed?  What was the dish?  If you haven’t, would you like to try it?


Wednesday, October 2, 2013

Beef Carbonnade

Ingredients for Beef Carbonnade including browned beef

Caramelizing onions and garlic
Cooking flour and beer

Layering beef, onions, and herbs

Pouring beer mixture into beef and onions

Dijon mustard croutons atop stew


                        Beef Carbonnade


Carbonnade a la Flamande is, as the name implies, a Flemish dish.  However, it is also traditional throughout the north of France.  Carbonnade means “charcoal cooked” but this is a rich oven-cooked stew of beef in beer.  This rich stew was the perfect dinner to greet autumn.

This recipe is adapted from The Food of France, A Journey for Food Lovers.


Beef Carbonnade

Ingredients:

1 oz butter

3 tablespoons cooking oil

2 ½ lbs beef chuck steak

2 cups chopped onions

1 teaspoon crushed garlic

1 teaspoon brown sugar

1 tablespoon all-purpose flour

2 cups beer (bitter or stout)

2 bay leaves

4 sprigs of thyme


Croutons:

6-8 slices baguette

Dijon mustard


Directions:

1.        Preheat oven to 300°F.  Melt the butter in a large pan with a tablespoon of oil.  Brown the meat in batches over high heat and then transfer to a plate.

2.       Add another tablespoon of oil to the pan and add the onions.  Cook over moderate heat for 10 minutes, then add the garlic and sugar and cook for another 5 minutes, adding more oil if necessary.  Remove onions to another plate.

3.       Reduce heat to low and pour in any juices that have drained from the browned meat if any, then stir in the flour.  Remove from the heat and stir in the beer, a little at a time.  The beer will foam.  Return to the heat and let the mixture gently simmer and thicken.  Season with salt and pepper.

4.       Layer the meat and onion in a casserole dish, tucking the bay leaves and sprigs of thyme between the layers and season with salt and pepper as you go.  Pour the liquid over the meat, cover with a lid and cook in the oven for 2 ½ - 3 hours, or until the meat is tender.

5.       To make the croutons, preheat the grill or broiler.  Lightly toast the baguette on both sides, then spread one side with mustard.  Arrange on top of the carbonnade, mustard side up, and place the whole casserole under the grill for a minute.


***********************

I was drawn to this recipe for 3 reasons:  I love the bold flavor of beef, the picture made my mouth water, and the Dijon mustard croutons piqued my interest.


As I was browning the beef, my father-in-law kept coming into the kitchen and exclaiming, “Mmmm, that smells good!” 

The recipe says to return the juices from the browned meat into the pan.  Unfortunately, my beef did not yield any juices probably because it was so lean.  So I just used a tablespoon of oil and stirred the flour in.  As the stew simmered in the oven, the aroma was wafting throughout the house.  My family couldn’t wait to eat! 


It was definitely worth the wait.  The beef was so tender it melted in my mouth.  My mother-in-law remarked that the onions were deliciously caramelized.  We all agreed that the flavors came together perfectly.  And the Dijon mustard croutons?  Oh, they were great!  The Dijon mustard cut through the richness of the stew and provided a nice crunch. 


This was definitely a winner and my family has already asked for it again. 


What dish did you make to greet fall?

Sunday, September 22, 2013

Beef Pastrami

Spices for the brine

Mixing spices with the brine
Brining the brisket in a bag

Ground pepper and juniper berries

Brisket encrusted with ground pepper and juniper berries


Smoking the brisket
Getting ready to slice the brisket

Beautiful ribbons of flavorful and aromatic pastrami

Beef Pastrami


So, you may ask, “What brought this about?”  My mother-in-law did.  She knows I like to cook and make stuff (like bacon).  She asked me how long I’ve wanted to make pastrami.  I said, “Oh, a number of years now.”  I printed the recipe almost two years ago but was intimidated by the length of time involved.   When I explained that the brisket is brined for 3 weeks, smoked for 4 hours, and boiled for 2 hours, she exclaimed, “I have new respect for pastrami!”  Who would want to do this when it’s so easy to pick up a package from the grocery store or the deli?  People like you and me because we don’t just like to eat; we want to get to get to know our food at an intimate level.  We want to know how it’s made, and how it feels to make it.
This recipe is adapted from Food Network (Emeril Lagasse, 1999).
Beef Pastrami
Ingredients:
2 tablespoons black peppercorns
1 tablespoon plus 2 teaspoons dried thyme
6 bay leaves, crumbled
2 teaspoons whole cloves
¼ cup minced garlic
2 teaspoons whole juniper berries, plus 1/3 cup crushed juniper berries
16 cups (about 4 quarts) water
¾ cup packed brown sugar
¾ kosher salt
1 beef brisket (4-5 pounds)
2/3 cup coarsely ground pepper
Directions:
1.        Combine the peppercorns, thyme, bay leaves, cloves, garlic and whole juniper berries in a skillet.  Over low-medium heat and stirring constantly, dry roast until fragrant, about 1 minute.
2.       In a saucepan, over medium heat, combine the water, brown sugar and salt.  Bring it to a boil and stir to dissolve the sugar and salt.  Remove from the heat and add dry spice mixture and steep for 1 hour.
3.       Place the brisket in a glass or plastic container.  Pour the seasoned brine to cover the brisket completely.  Cover and refrigerate for 3 weeks, turning the brisket every couple of days.
4.       Preheat the smoker.
5.       Combine the crushed juniper berries and ground black pepper in a shallow dish.  Using the palm and heel of your hand, press two-thirds of the berry and pepper mixture into the brisket.  Press the remaining mixture into the other side.
6.       Place the brisket in the smoker and smoke for about 4 hours.  Remove from the smoker and cool for 30 minutes.
7.       Place the brisket in a large Dutch oven, cover with water and place over medium heat.  Bring the liquid to a boil, reduce to a simmer and cook for two hours.
8.       Remove from the pan and cool completely.  Slice into thin slices and serve.
******************
The other reason it took me so long to make this was that I could not find juniper berries.  I finally did find it at Whole Foods: $3.25 for a 0.2 oz sachet of organic whole juniper berries.  I had to buy about 7 sachets.  Hmmmm, plus about $20 for the brisket.  No wonder these deli meats are so expensive! 
Tip #1: One of the steps I added to this recipe was to dry roast the spices.  Cooking with Indian food has taught me that dry roasting spices heats the oils in the spices and enhances their flavor.  Oh, and the fragrance!  If you close your eyes you’d think you were in the middle of the spice market in Marrakesh!
Tip #2:  Whenever a recipe calls for marinating, I use re-sealable plastic bags because I can get all the air out, and the food will always be submerged/surrounded by the brine.  Be sure to double or triple the bags so that even if the first bag leaks you won’t have a mess in the fridge.  The thicker “freezer” bags work best.
Tip #3:  Crushed juniper berries?  Emeril didn’t say how to do that.  Chopping them by hand would’ve resulted in little juniper berries all over the kitchen floor.  So I used my coffee grinder like I do for my other spices.  It’s fast and the ground spices are in one space.  Since I can’t wash the grinder I clean it by grinding uncooked rice in between spices.  Juniper berries have a “piney” fragrance as they are products of conifers.  Did you know that gin is made from juniper berries?
Tip #4:  No smoker?  No problem.  I don’t have one either so I use my Weber kettle grill.  By banking the lit charcoal on one side of the grill and the food on the other side, it works just as well.  See picture above.  Again, Emeril didn’t specify what wood to use.  Since I was working with beef, I excluded apple which I use for my bacon.  I thought the mesquite might be too strong, so I decided on hickory.
Tip #5:  I refrigerated the cooked and cooled brisket overnight before slicing.  This ensured that the meat was compact making it easier to slice.
I was giddy with excitement!  I sliced the entire brisket before tasting one of the scraps – it was amazing!!  The flavor was so complex yet I was able to pick out the individual tastes of the ground pepper, juniper berries, and smoke.  It wasn’t spicy or salty.  None of the ingredients overpowered the others; it was like a symphony of flavors on my tongue!!   The pictures don't do it any justice; you just have to taste it.  And it was certainly well worth the time and effort to make this. 
Finally, what am I going to do with 3 ½ lbs of homemade pastrami?  A lot of Pastrami on Rye sandwiches for starters.
What dish have you eaten impressed you so much that you had to make it yourself?